Users And Permissions
Every person who uses OnVeris signs in with their own user account. The account's type and permissions decide what that person can do — from only chatting in OnVeris Chat to managing the whole Gateway. You can give each person exactly the access their role needs.
User accounts are managed from the Settings window, in the Users section. You need the Users permission to see this section.
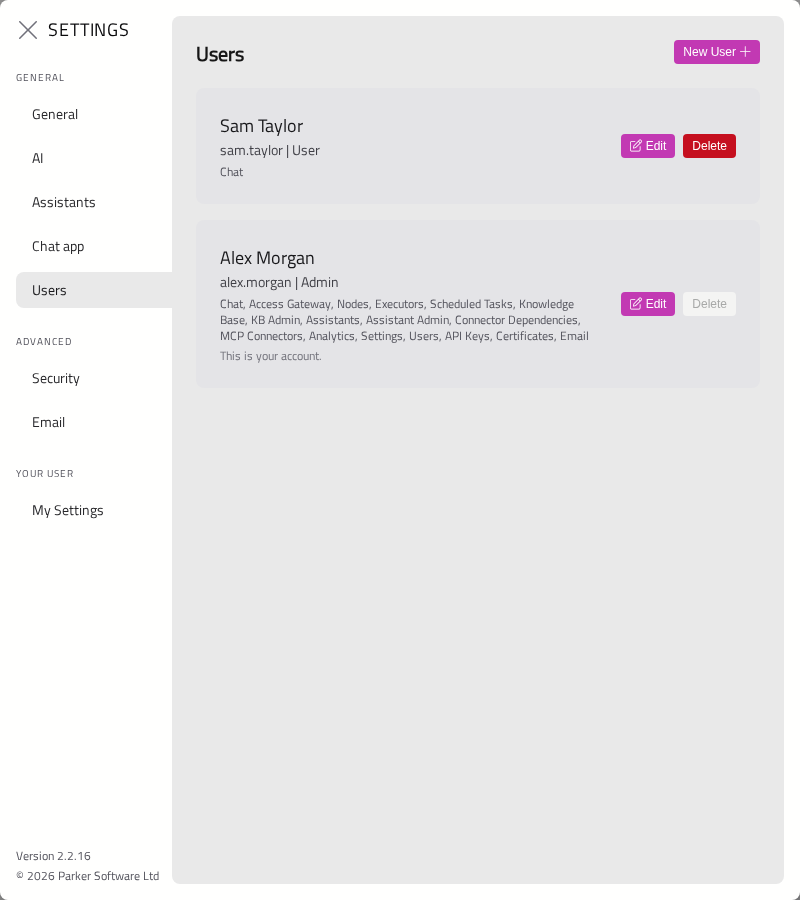
Each user is shown as a card with their name, username, account type and permissions. Your own card says This is your account.
User Types
There are two types of account:
Admin accounts have every permission, because of their type rather than the boxes ticked for them. Any permission added in a later version of OnVeris applies to them straight away.
User accounts have exactly the permissions ticked for them. A User account without Access Gateway can only use OnVeris Chat — it will be taken straight there on login and cannot reach any administration page.
The type is chosen when the account is created and cannot be changed afterwards.
Creating A User
Click New User.
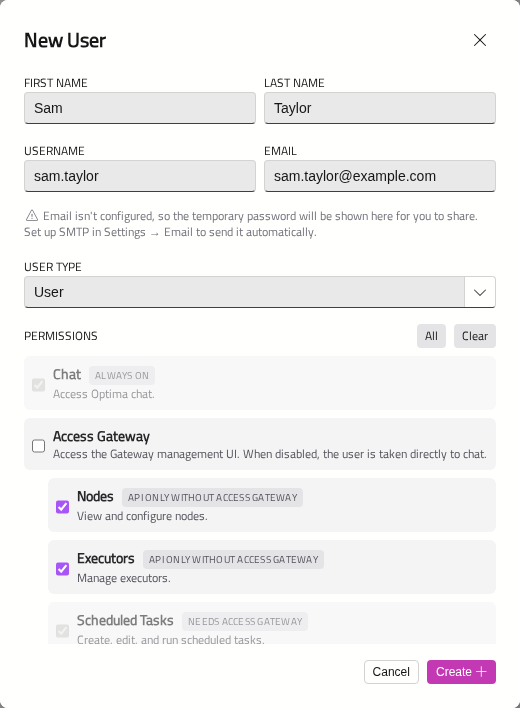
- Enter the person's First Name, Last Name, Username and Email. Email is required.
- Choose a User Type. It starts as Admin — choose User for anyone who should not have full access.
- For a User account, tick the Permissions they should have. All ticks everything; Clear leaves only Chat.
- Click Create.
You do not choose a password. OnVeris will create a temporary one:
- If email is set up, the temporary password will be emailed to the person.
- Otherwise, a Temporary password window will show it to you, once. Pass it on securely.
The temporary password expires after 72 hours. The person will be asked to choose their own password the first time they sign in.
Note
A new User account starts with every permission ticked except OnVeris Connectors and Analytics. Untick anything the person should not have before you click Create.
User Limits
Your licence may limit how many users the Gateway can have. When the limit is reached, creating another user will be refused with a message saying so. Existing users are never removed. See Licensing.
Editing A User
Click Edit on a user's card. You can change their First Name, Last Name, Email and Permissions, then click Save.
Resetting A Password
In the edit window, click Reset password. A new temporary password will be created and either emailed or shown to you, as when the account was created. The person's old password will stop working.
Deleting A User
Click Delete on a user's card and confirm. You cannot delete your own account.
Note
Someone must always be able to manage users: an Admin account, or a User account with Access Gateway, Settings and Users all ticked. OnVeris will not let you delete the last such account, or untick any of those permissions on it.
Permissions
Permissions are arranged as a tree. A permission indented under another only works when its parent is ticked too — for example, Nodes needs Access Gateway.
| Permission | What it allows |
|---|---|
| Chat | Use OnVeris Chat. Always on |
| Access Gateway | Use the Gateway's administration pages. Without it, the user is taken straight to chat |
| Nodes | View and configure Nodes |
| Executors | Manage models on Nodes: download, start, stop and configure them |
| Scheduled Tasks | Create, edit and run Scheduled Tasks |
| Knowledge Base | Open the Knowledge page, create Knowledge Bases, and manage the ones shared with them |
| KB Admin | Reach and manage every Knowledge Base |
| Assistants | Create Assistants, and change the ones shared with them |
| Assistant Admin | Use and manage every Assistant, and chat with models directly when only Assistants are allowed |
| OnVeris Connectors | Install, create, edit, import, export and remove OnVeris Connectors, switch them on and off, and set their credentials. Does not include giving Connectors to Assistants, which needs Assistant Admin |
| Connector Dependencies | Approve installing the Python packages Connectors declare, and choose which environment variables Connector tools can see |
| MCP Connectors | Add, change and remove MCP Connectors, choose who can use them, and give them to Assistants |
| Analytics | See who is using the Gateway, how much and how it is going. Never shows what anyone said |
| Settings | Open the General and AI sections of Settings, and the Licence page |
| Users | Add, edit and delete users |
| API Keys | Create and revoke API Keys for anyone |
| Certificates | Change the Gateway's certificate, and open the Security section |
| Set up the mail server and edit the emails OnVeris sends |
When a permission's parent is not ticked, the permission will be greyed out and marked Needs followed by the parent's name. A few permissions also control what a user's API Keys can do. These stay available and are marked API only without the parent: the user cannot use the page, but their API Keys can use the matching part of the API. See API Keys.
Note
To manage API Keys in Settings → Security, a user needs both Certificates (to open the section) and API Keys.
Permissions Added In Later Versions
When an update adds a permission, existing User accounts do not get it automatically, so you must tick it for the people who need it. The exception is a permission that takes over something people could already do. It is given once, during the update, to everyone who could do that before, so nobody loses access. OnVeris Connectors is one of these: every User account with Access Gateway was given it when it arrived.
What Every User Can Do For Themselves
Whatever their permissions, every user can:
- Change their own theme and animations in Settings → My Settings.
- See and create their own API Keys, on My API keys in the Gateway's menu.
- Connect their own accounts in other systems, for tools that act as them, on the Connected accounts page. It is in the Gateway's menu when there is something to connect, and OnVeris Chat opens it when needed. See Signing In to MCP Connectors.