API Keys
An API Key lets an application or script use the OnVeris API without a person signing in. Each key either acts as a particular user, or belongs to no one and can do only what you grant it. You can create as many API Keys as you need — for example, one for each integration — so that each can be limited, monitored and revoked on its own.
API Keys are managed in the Settings window, in the Security section.
Note
Every API request needs an API Key or a signed-in user. Earlier versions of OnVeris accepted any request while no keys existed. That is no longer the case: a new Gateway will refuse API requests until a key is created. A Gateway upgraded from an open setup is given a temporary key, and shows API requests are being refused until you replace it.
The API Keys Card
Open Settings → Security. The API Keys card shows how many keys exist, with three buttons:
- Manage API Keys — opens the list of keys. You will need the API Keys permission.
- Security log — a record of key changes and refused requests.
- Refresh — updates the card.
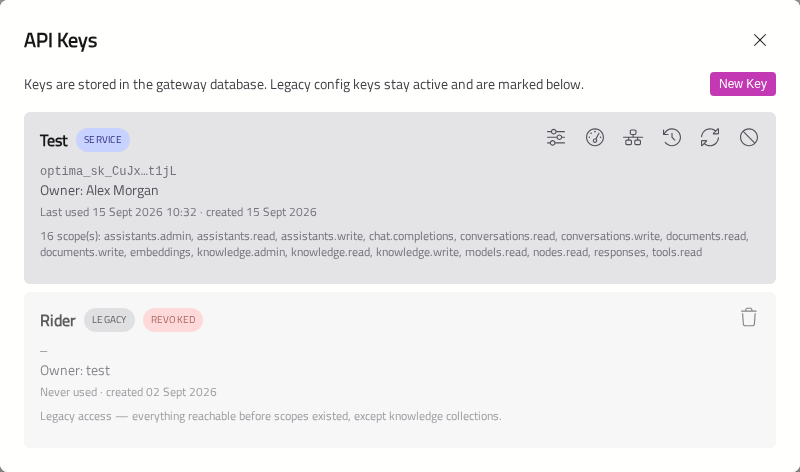
Kinds Of Key
There are three kinds of API Key. Use a User Key for a person's own scripts, and a Service Key for anything else.
| Kind | What it can do | Best for |
|---|---|---|
| User key | Acts as one user, and can do exactly what that user can do. If the user's permissions change, so does the key | A person's own scripts and tools |
| Service key | Belongs to no user. It can only do what you grant it, and starts with nothing | Integrations and automation |
| Legacy | A key created before key kinds existed. It can use most of the API, but not Knowledge Bases or Assistants | Upgrade these when you can |
Creating A Key
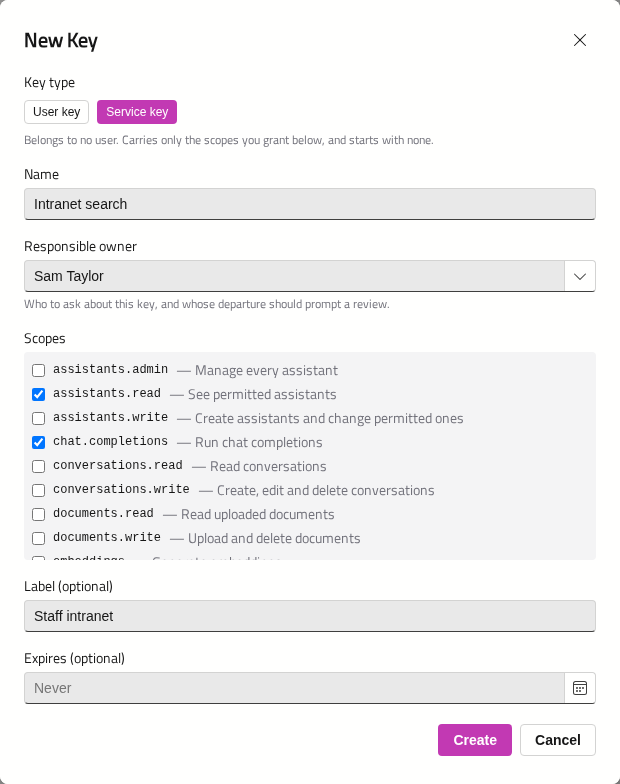
- In the API Keys window, click New Key.
- Choose the Key type: User key or Service key.
- Enter a Name that says what the key is for — for example, Intranet HR widget.
- For a User Key, choose who it Acts as. For a Service Key, choose a Responsible owner — the person to contact about it — and tick its Scopes (see below).
- You can optionally add a Label and an Expires date.
- Click Create.
The key will be shown once. Copy it and store it somewhere safe — OnVeris will not show it again.
Note
You can only give a Service Key scopes you hold yourself.
Scopes
A scope is one area of the API. A Service Key can use only the scopes ticked for it. A User Key has the scopes that match its user's permissions.
| Scope | What it allows |
|---|---|
chat.completions |
Run chat completions |
responses |
Use the stateful responses API |
embeddings |
Generate embeddings |
models.read |
List models and their context sizes |
knowledge.read |
Retrieve from permitted knowledge collections |
knowledge.write |
Create, upload to and reindex collections |
knowledge.admin |
List every collection and edit access |
conversations.read |
Read conversations |
conversations.write |
Create, edit and delete conversations |
documents.read |
Read uploaded documents |
documents.write |
Upload and delete documents |
tools.read |
List available tools and their token costs |
nodes.read |
Read Node status |
assistants.read |
See permitted Assistants |
assistants.write |
Create Assistants and change permitted ones |
assistants.admin |
Manage every Assistant |
A request that needs a scope the key does not hold will be refused with 403, naming the scopes it needed. See Authentication.
Managing A Key
Each key in the list has the following actions:
| Action | What it does |
|---|---|
| Edit scopes | Change a Service Key's scopes |
| Upgrade | Turn a Legacy Key into a User Key or a Service Key, keeping its value |
| Rate limits | Limit how many requests the key may make per second, minute or hour. Set a Default for everything, then optional overrides for particular scopes |
| Allowed addresses | Only accept the key from listed IP addresses or ranges, one per line — for example 10.0.0.0/8 |
| History | When the key was created and changed, and by whom |
| Regenerate | Issue a new value for the key. The old value will stop working at once |
| Revoke | Stop the key working, with an optional reason. A revoked key can then be Delete permanently-d |
A key past its expiry date will be marked Expired, and will stop working.
Note
If the Gateway sits behind a proxy or load balancer, every request may appear to come from the proxy's address. Check what address OnVeris sees before you rely on Allowed addresses.
Using An API Key
Send the key in either of these HTTP headers:
X-API-Key: your-key-here
Authorization: ApiKey your-key-here
See Authentication for examples.
A User's Own Keys
Users with the Access Gateway permission can create and manage keys for themselves, without the API Keys permission. They do this on My API keys in the Gateway's menu, which is also at /Account/ApiKeys on the Gateway:
https://<your-gateway-address>/Account/ApiKeys
Click New key, give it a Name and an optional expiry, and click Create. The key will be shown once, in Copy your key now. These are User Keys: they can do what the user can do, and no more.